
Composer is a dependency management tool in PHP. It allows you to declare the dependent libraries your project needs and it will install them in your project for you.
You must have PHP installed in your machine prior to installing “Composer”.
Composer requires PHP 5.3.2 or above (at least 5.3.4 recommended to avoid potential bugs).
Here are the steps to install the “Composer” tool in Windows machine.
Step 1. Download windows installer Composer-Setup.exe from https://getcomposer.org/Composer-Setup.exe

Step2. Double click the downloaded exe file to run it. In the open window click the “Run” button.
Step 3. Click the “Next” button after following the instructions displayed in the screen the screen
Step 4: Locate the php.exe file and select it (I had XAMPP installed in my machine, the file was located at {{XAMPP_FOLDER}}/php folder). Click “Next” to proceed to the next step.
Step 5: Review the information displayed and click the “Install” button. Make sure that you are connected to the internet before clicking the “Install” button.
Step 6: Installer is trying to download composer.
Step 7: Downloader has detected that PHP openssl extension is not available so it halted the download process.
I checked the PHP extension folder {{XAMPP_FOLDER}}/php/ext, php_openssl.dll exists there.
Now I check the php.ini file located at {{XAMPP_FOLDER}}/php folder. I uncomment the line below by removing the semi-colan and save the php.ini file so that the openssl extension gets loaded.
;extension=php_pdo_mysql.dll
After making this change I click the “Back” button in the above composer screen. It takes me to Step 5 screen, click the “Install” button again now.
Step 10: After the Composer is download and installed on your machine, the following information is displayed. Take note of the information and click the “Next” button.
Step 11: Composer setup is finished, Click the “Finish” button to close the installation wizard.
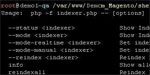
Step 12: Now lets verify that “Composer” was installed successfully. Open a new command window and type “composer” and hit enter. It should display a screen as shown below.
If you get a error “composer’ is not recognized as an internal or external command, operable program or batch file.”, try the instructions in the Step 10 wizard screen and then run the command again. Windows system variable “Path” is set/updated during the installation process, unless this variable update does not reflect the composer command will give error.
If nothing works restart the system, the path changes will reflect.
The following is appended to the Windows system variable “Path”:
{{XAMPP_FOLDER}}\php;C:\Documents and Settings\All Users\Application Data\ComposerSetup\bin
Important Links:
Composer Official Website: https://getcomposer.org/
Github: https://github.com/composer/
Packagist: https://packagist.org/


Leave a Comment